|
DecoTech™ Designer and DecoTech™ Professional
version 6.00 Upgrade
(Click
here for Update v6.11 Improvements List)
Upgrade
v6.00 Improvements List |
| General |
| 01- |
All programs recompiled in
native 32bits for Windows
98SE,
ME, NT4.0, NT5.0, 2000, XP.
(DecoTech will no
longer runs under Windows 3.xx or 95.) |
| 02- |
True
Color mode support. (DecoTech will no longer runs in
256-color mode.) |
| 03- |
Sound Effects notifications are now played
for a lot of circumstances. |
| 04- |
Possibility
to create your own Sound Effects Schemes. |
| 05- |
Printing features now work perfectly under almost all possible configurations of computers, printers, display cards and drivers. |
| 06- |
Auto-checking
via Internet if a more recent revision or version is
available. |
| 07- |
If you have chosen to
install the calculator accessory during your Microsoft®
Windows™ installation, a new Cal button will
appears among the other four top/left buttons already
there in all the DecoTech main programs (with
the exception of the Animator program).
Just one click and you are ready to use it like the other
DecoTech programs. |
|
Scene
Editor
program |
| 01- |
You can now specified default Local Top/Bottom Light Valance values for newly added cabinets. |
| 02- |
You can now copy all/partial object's
data back to the Adjusting Adding Preferences window. |
| 03- |
You can now replace a pattern file name by another one on many objects of same type in one step. |
| 04- |
256
pens available in 3D perspective instead of 64. |
| 05- |
Improvement of the Colors
Adjusting window with a customizable Color Bank
of single or multiple color presets. You can save up
to 256 colors in a single preset. Two new functions
have been also added: Spread Color and Reverse
Order. They are respectively activated by
holding down the Control key and clicking the Copy
or Exchange buttons. |
| 06- |
Now
support PNG image file format. |
| 07- |
9 pens available per
pattern instead of 4. |
| 08- |
New
file requester to load/save/delete 3D
perspectives. |
| 09- |
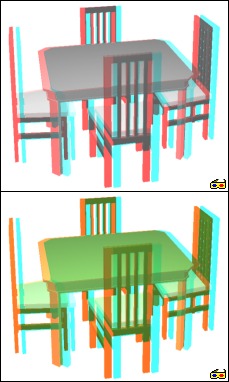
New stereoscopic display
mode: Red Blue Anaglyph in grayscale or pseudo-color.
The Adjusting 3D Perspective Parameters window has
been improved to create Red Blue Anaglyph stereoscopic 3D
perspective that can be viewed with simple low cost red
blue glasses. When you are viewing a stereoscopic 3D perspective, it is like if you are standing directly inside the 3D perspective. You are able to evaluate depths like you do in real life. |
| 10- |
New modifiable pens for
each object types and other drawn elements like the floor
plan and the new adjustable floor plan grid that
auto-snaps to the current set origin. Also the four
customizable origins are now saved with the scene and when
creating a new scene the origin is automatically set to
the position of the first added object. |
| 11- |
Closing the 3D perspective window no more causes the Scene Editor program to exit. |
| 12- |
When switching from another program, the edition cross is now activated properly. |
| 13- |
Improved drawing speed and
size when adding/picking up large group-object. They
can take up to 90% of the working area before being
replaced by a blue frame. Also they are now
displayed with their own new floor plan color. |
| 14- |
Four
different floor plan palettes
already set for filled or not filled objects
and for color or black & white. It is now
easy to obtain printouts with only solid white objects
that are easy to read when sent by fax. |
| 15- |
New switches to enable or disable the
presence on the floor plan
or 3D perspective printout of a rectangular frame, the
current scene file name and comment, date and time. |
| 16- |
New
in Palette Adjusting windows, the Auto-Set Crayons
button that automatically set new crayon numbers to the most used surface types.
New crayons are chosen relatively to the current crayon number assigned to the
Object surface. |
| 17- |
Now support paper size greater than 8.5" x 11" for text printout. |
| 18- |
You
can now customize presets within the Selecting
Objects Visible on the Floor Plan window. |
| 19- |
New Convert the type of
an object into another type window that can change the
types of all the currently selected objects into another
type. For example, stairs built with miscellaneous
type objects can be quickly converted to floor type
objects so you will be able to apply floor patterns on
them. |
| 20- |
In the
Advancing sides of a Polygonal Shape window, two new buttons has been added letting you to
add more quickly stacked objects. (When creating
moldings for example.) |
|
Cabinet
Editor
program |
| 01- |
You can now toggle horizontally and/or vertically the handle of the door you are currently adding. Just hold down the shift and/or control key before clicking the final position of the door. |
| 02- |
You can now toggle horizontally and/or vertically the handle of an already added door. Just select the
Information on the add-on button, then hold down the shift and/or control key and click the door. |
| 03- |
When switching from another program, the edition cross is now activated properly. |
| 04- |
16
crayons are now available to draw the preview instead of
8. |
| 05- |
Two new editor modes (buttons)
have been added in the
edition window to permit toggle
added doors (left <-> right AND top <->
bottom). |
| 06- |
A
new button has been added in the
edition window to open the new Miscellaneous edition tools window. This new window offers the
possibilities to resize or convert to its horizontal mirror
reflection, the currently edited cabinet. |
| 07- |
New feature added to the
old Information on the add-on button. Now it
can also opens a small and quick window that contains a
lot of information about the clicked add-on. |
| 08- |
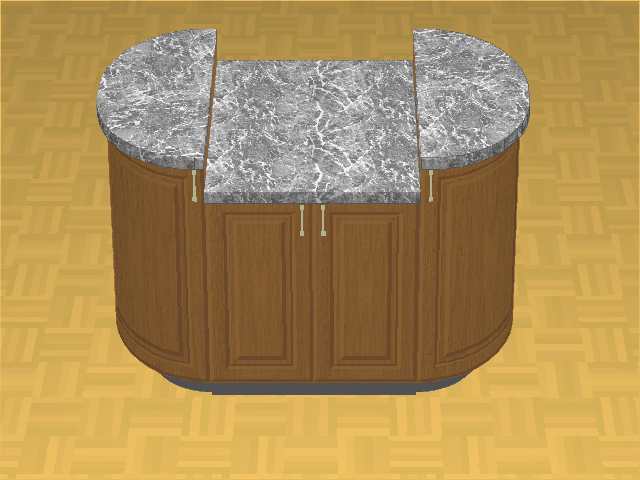
In the
3D Preview window, a new button has been added ( in
the
bottom right corner) letting you to save the currently displayed 3D
preview image. To save an image with a white
background, simply exchange the colors of the white and
gray pens before the saving. |
|
Pattern
Editor
program |
| 01- |
9 pens available per
pattern instead of 4. |
| 02- |
The
More Add feature, activated by holding down a Control key during an adding, has been replaced by the
Horizontal/Vertical Mirror feature, activated by holding down Shift and/or Control keys. |
| 03- |
When switching from another program, the edition cross is now activated properly. |
| 04- |
Strip
relative position can now be specified in any percentage
values of the object's surface dimension instead of the actual 3
ones: 0.0 = Left/Top edges, 0.5 = Center,
1.0 = Right/Bottom edges. |
| 05- |
New
features in the Information
about Selected Strip window: The strip's shape can now
be changed to another one without needing to re-add it.
New toggle button to protect offset values to be
automatically changed when modifying the relative
positions. Final strip's dimensions displayed in
real time. |
| 06- |
New
features associated to the Info mode: The
Horizontal/Vertical Mirror of Strip Shape
feature activated by holding down Shift and/or Control
keys. The Copy Strip Settings to Current Default
feature activated by holding down the Alternate key. |
| 07- |
16 crayons are now
available to draw the preview instead of 8. So in
the Scene Editor program when you ask to copy the colors
from a pattern file to the 3D perspective, it also copies
those new colors. (Ex.: cabinet top and bottom light
valences, etc...) |
| 08- |
The
drawing of the central guiding cross has been replaced by
the drawing of the current relative positions guiding
lines with 3 displaying modes: None, Over and Under. |
| 09- |
New Advanced
Miscellaneous Edition Tools window make it easier to
modify used crayons and relative positions of many strips
at the same time. |
| 10- |
New Import
and Convert Image File feature opens the door to a lot of new
possibilities.
|
| 11- |
New Pattern Clipping
feature that eliminates pattern overflow on
non-rectangular surfaces. |
| 12- |
Improvements
in edition mode that now allows you to select/modify
strips that are outside the editable working surface. |
| 13- |
In the 3D Preview window, a new button has been added
(in the
bottom right corner) letting you to save the currently displayed 3D
preview image. To save an image with a white
background, simply exchange the colors of the white and
gray pens before the saving. |
|
Price
Manager
program |
| 01- |
Now support paper size greater than 8.5" x 11" for text printout. |
| 02- |
You can now change the
prices of cabinets saved into the group-object catalog. |
|
Cabinet
Itemizer
program |
| 01- |
Now support paper size greater than 8.5" x 11" for text printout. |
| 02- |
Auto-size
the main window to
use the maximum screen size available. |
|
Animator
program |
| 01- |
Mouse pointer is now always visible in the animation window. |
| 02- |
Closing the animation window no more causes the Animator program to exit. |
| 03- |
Clicking in the animation window now bring to front the the control window. Other shortcuts to switch between the two windows have also been improved. |
| 04- |
Now
support PNG image file
format.
(Import/Export) |
| 05- |
Now support 24 bits
animation format. (16,777,216 colors) |
| 06- |
New
file requesters with long file name support to load/save/delete
image and animation files. |
|
Some
screen shots from version 6.00 :
New Sound Effects
configuration window.
The
edition window in the Pattern Editor program now offers 4 new pens plus
the pen of the object's surface. You can also specified in percentage
of the object's surface dimension, the absolute position from where each
pattern strip position is relative to. For example, you can now
create a resizable window made with 4 horizontal and
3 vertical rectangular glasses of same size.
The
edition window in the Scene Editor program now offers a lot of new pens
fully modifiable for each object types and other drawn elements like
the floor plan and the new adjustable floor plan grid, that auto-snaps
to the current origin set. You also have now four different
floor plan palettes already set for filled or not filled
objects and for display or printout. So it is now
easy to obtain printouts with only solid white objects that are easy
to read when sent by fax.
The new Auto-Set
Crayons button automatically set new crayon numbers to the most used surface types.
New crayons are chosen relatively to the current crayon number assigned to the
Object surface.
The new Advanced
Miscellaneous Edition Tools window in the Pattern Editor program
make it easier to modify used crayons and relative positions of many
strips at the same time.
The new Import
and Convert PNG Image File feature of the Pattern Editor program
opens the door to a lot of new possibilities.
However, this is still not bitmap mapping yet but
it does a good job.
Using many of imported/converted PNG
images at the same time needs a lot of memory and takes a lot of time to
draw but it creates stunning 3D
perspectives.
The new Pattern
Clipping feature now eliminates pattern overflow on
non-rectangular surfaces.
In the Scene Editor program,
the Selecting Objects Visible on the Floor Plan window has now
customizable presets.
The Available help window
is now the one opened by the little white question mark button located
in the top right corner of all the six DecoTech main programs (with
the exception of the Animator program). New features are
self-explanatory.
The How to display
the Built-In Micro-Help window has changed just a little
bit. It is now opened by the Available help window.
In the Scene Editor program,
the Miscellaneous options window has only been redesigned using
the Windows 95 user's interface standards.

In the Scene Editor program,
the Names of the group-objects categories window has only been
redesigned.
It looks familiar for old users. Does it?
In the Scene Editor program,
the new Size of the lettering on the floor plan window let you
set a specific height for the lettering that appears on the floor
plan.
In the Scene Editor program,
the Print the 3D perspective window now let you specify a print
quality (with anti-aliasing support) and choose to overprint some
useful information. You can also now customize a print setup
associated only with this window and automatically saved for future
printings.
In the Scene Editor program,
as you can see, the Print the floor plan window has been
greatly improved. As in the Print the 3D perspective
window, you can now specify a print quality, the number of copies,
choose to overprint some useful information and customize a print
setup associated only with this window and automatically saved for
future printings. Also, you can now easily select another
display mode other than the currently one used at the screen (useful
when printing directly to the fax). Finally, it is now very easy
to save an image of the floor plan if you plan to use it with other
programs (ex.: send it as an e-mail attachment).
In the Scene Editor program,
the Print the list of cabinets window is now separated from the Print
the floor plan window. You can now specify the number of
copies and customize a print setup associated
only with this window and
automatically saved for future printings.
The
edition window in the Cabinet Editor program now offers two new editor
modes to easily toggle added doors (left <-> right and top
<-> bottom). Also, a new button has been added to open the
new Miscellaneous edition tools window.
In the Cabinet Editor program,
the new Miscellaneous edition tools window offers the
possibilities to resize or convert to its horizontal mirror
reflection, the currently edited cabinet. It also
displays some useful miscellaneous information about the currently edited
cabinet.
In the Cabinet Editor program,
a new feature has been added to the old Information on the add-on
button. Now it can also opens a small and quick window that contains a lot of information about the clicked add-on.
If you have chosen to
install the calculator accessory during your Microsoft® Windows™
installation, a new Cal button will appears among the other four
top/left buttons already there in all the DecoTech main programs (with
the exception of the Animator program).
Just one click and you are ready to use it like the other DecoTech
programs.

In the Scene Editor program,
the new Convert the type of an object into another type window
can change the types of all the currently selected objects into another
type. For example, stairs built with miscellaneous type objects can
be quickly converted to floor type objects so you will be able to apply
floor patterns on them.
In the Scene Editor program,
the Adjusting 3D Perspective Parameters window has been improved
to create Red Blue Anaglyph stereoscopic 3D perspectives in grayscale
(top) or pseudo-color (bottom). They can be viewed with simple low
cost red blue glasses. When you are viewing a stereoscopic 3D perspective, it is like if you are standing directly inside the 3D perspective.
You are able to evaluate depths like you do in real life. Also two
new Auto-Ratio buttons have been added for quick calculation
using either the width or the height but putting the same result in both
Ratio X and Y text boxes.
In the Scene Editor program,
in the 3D Perspective window, a new button has been added (in the
bottom right corner) letting you to change quickly the current generation mode.
In the Pattern Editor and
Cabinet Editor programs,
in their 3D Preview window, a new button has been added (in the bottom right
corner) letting you to save the currently displayed 3D preview image.
To save an image with a white background, simply exchange the colors of
the white and gray pens before the saving.
Improvement of the Colors
Adjusting window with a customizable Color Bank
of single or multiple color presets. You can save up
to 256 colors in a single preset! Changing colors of a wood floor
or the door style of cabinets as never been so easy and fast. Two
new functions have been also added: Spread Color and Reverse
Order. They are respectively activated by holding down the Control
key and clicking the Copy or Exchange buttons.
In the Scene Editor program,
in the Advancing sides of a Polygonal Shape window, two new buttons has been added
letting you to add more quickly stacked objects. (When creating
moldings for example.)
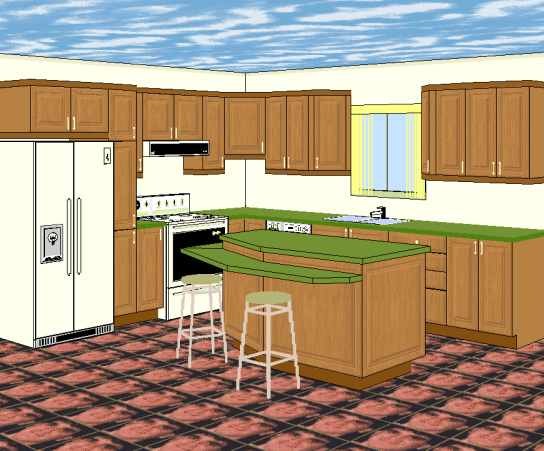
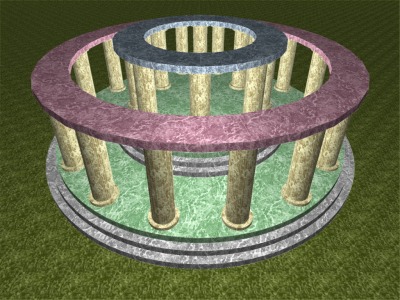
The image below has been
created using the Scene Editor and Pattern Editor programs. Only
advanced users can expect to do such image.
|